Thursday, April 22, 2021

Assembling a teeny tiny 240 page book


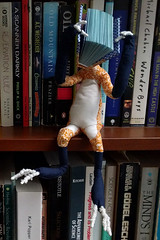
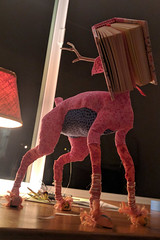
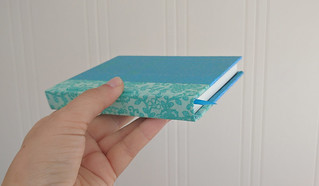
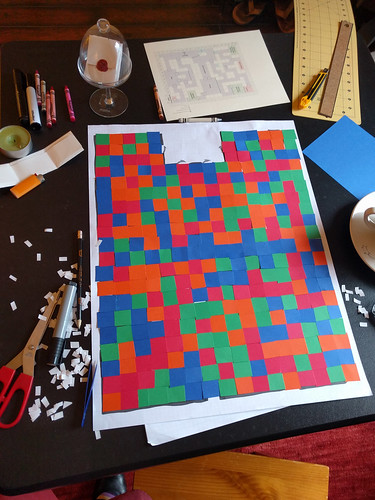
Interested in trying your hand at tiny bookbinding or a fan of old French poetry? I’m in love with my mini books and want to share them with you! While I enjoy my fancy cased & trimmed copy this version is very accessible to anyone who is curious. 
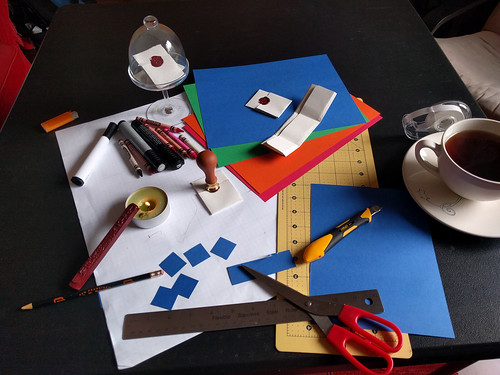
Supplies:

  • the text [PDF link via Google Drive]
    • 2 pages, front and back
    • print flipping “on the short side”
    • I print at “HQ 1200 DPI” settings but probably not needed
  • 3 sewing needles 
  • thread (I work with 3 strands of embroidery floss) 
  • scissors
  • T-pin or awl or tapestry needle (for hole punching)
  • Scrap paper (ideally firm, card-stock like) for guides
  • bone folder or some sort of straight edge to help make crisp folds
  • (optional) small rings to make hang-able
  • cover materials (could be easily substituted with chip board or thick cardboard)
    • thin balsa wood
    • balsa wood saw (I normally use this to cut holes in my signatures)
    • tiny drill
    • (optional) ink/stain to fancy that wood up
    • sand paper (100 grit for basic smoothing, 220 if you want to touch it up)

  1. Print Text - make sure it’s flipped “on the short side” -- if you don’t the pages will be “upside down” on the opposite side of the sheet. I scale up to fill printed page, but that’s not needed, it’ll gain you just a little bit of extra room. Be careful not to lose the markings depending on your printer/paper size!
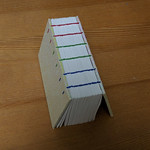
  2. Cut Text - There’s very thin lines dividing each signature row. Cut carefully! Would definitely recommend cutting by hand. Pick one side of the paper and use that as the guide for all your cutting (there may be some skew front/back due to printer variance) 
  3. Fold Signature - there are very tiny marks at the page edges and in the center of a folio. Some markings may have been trimmed off in step 2- don’t worry. Check the top/bottom/front/back for alignment markers. 
    1. There will be very minor overhand on the start/end of each row
    2. Look for the pair of pages with consecutive numbers (should be on the left hand side of the signature. Don’t see it? Turn signature over and check again. These will be the “top” of the zig-zag.
    3. Each “fold” of the zig-zag is 2 tiny pages (a folio)
    4. Make sure you’re checking/enforcing horizontal alignment. Line marks up left-right with the tiny ticks then lightly “pinch” the signature top and bottom around center of folio to make sure it’s level as you crease the fold. Optimize for “level” folds, then optimize for centering the tick-marks.
    5. “Bone down” all your creases after you’re done zig-zag folding (take a bone folder or something with a hard level edge and rub the folds to make them crisp-- just like origami)
    6. Fold folio in half (the consecutive pages should be the center of the fold) and bone down the spine
  4. Punch Holes - in this step you’ll be punching holes in the center fold of each folio. (Normally I cut them with a balsa saw blade but these are too tiny/finicky)
    1. take your scrap paper (junk mail is a great source for this) and cut it to the about the size of a signature. It should be wider than the signature (extend past the folded pages’ edges) but exactly the same height! 
    2. Mark the HEAD and make sure it’s always at the top when punching. Mark & poke 3 holes in it. Center one and then... you know... one above and one below that. Don’t punch them too close to the edge or each other! 
    3. Tuck the guide inside each signature and punch those holes all the way through the signature. I put some scrap cardboard behind it to help but sometimes I just hold it in my hand and punch w/ no backing
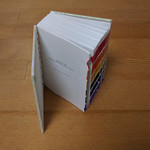
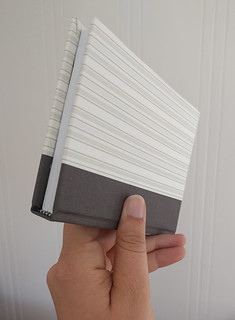
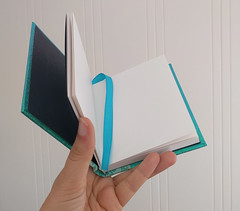
  5. Prep Cover - this is where variants can some in- I prefer to sew on a single cord for the necklaces or if I’m putting it in a case but this book is  coptic-like/exposed spine so focusing on that
    1. Figure out your final signature size- how much are you willing to trim off the ends? This depends on how neat your folding/printing went. Make another guide from scrap paper. This should be the same height as the signatures but shorter than the folded pages’ width- it should be the width of what you want the final page to be.
    2. Using the guide, cut out your covers to that exact size (error larger). Balsa wood & saw wasn’t instantaneous but totally doable. Just be patient (< 5min of sawing?) 
    3. Drill holes (or punch if you can) at the correct heights (use initial guide you made). Two holes per signature hole are required- put them near the edge/near each other but no so close that your material will split/crack/be weak. Use best judgement. 
    4. (optional/hindsight) I didn’t do this, but if you can-- put a small divot at the furthest-from-spine hole on the inside for the knot to rest in.
    5. (optional) stain/color/paint/decorate your cover
  6. Start Sewing - select your thread. You need 3 needles, threaded with the same amount of floss. To calculate use the formula “height of signatures” x “number of signatures + 1″ - for this sewing there’s already extra built into that. The next steps need be applied to each of the 3 signature rows
    1. Put a knot at the end of the thread and run it through the back cover in the furthest-from-spine hole, going from “inside” to “outside” of cover.
    2. Loop back and come in from the closest-to-spine hole, going from “outside” to “inside” of cover.
    3. Make a loop, you’re going to need to keep this loose and will tighten it later. Exit the same hole you just came through, going from “inside” to “outside” (if you pull too hard, the loop will just pop out and you’ll have to go back to step 6.2).
    4. From the “outside” of the cover, bring the needle around the spine-edge of the cover and go through the loop you just made.
    5. Tighten everything.
    6. You are now read to sew signatures 
  7. Sew a Signature - each signature is the same until you reach the front cover
    1. Trim left & right edge of signature using the guide you made in step 5.1 using scissors (you’re cutting through 5 sheets in one go- hard but not impossible). This separates all the pages and is done at the last moment to try and make things easy for sewing. You could do this after assembling the book if you’d like.
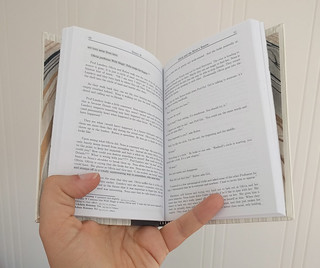
    2. Run all the needles through the holes they correspond to going from outside of signature to inside of signature.
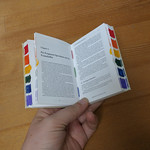
    3. Each needle exists the signature in the following order. This requires tension (the signature should be flush against the text block) and precision. High dexterity step, see photo above for advice on how to hold it.
      1. Top thread goes out through middle hole
      2. Middle thread goes out through bottom hole
      3. Bottom thread goes out through top hole
    4. Tighten all the threads, make sure it’s snug, and then bone down the spine again as best you can now that it’s part of the text block
    5. (optional) If you wanted to add rings, sew them in between signatures 5-6, 6-7, and 7-8. 
    6. (optional/hindsight) I forgot to “kettle” my stitches- you could do so here if you know how but I’m not going into details
  8. Finish / Cover - the short of it is “do everything you did in step 6, but backwards”. Each thread is finished the same way:
    1. go from the “outside” to the “inside” of the closest-to-spine hole on the front cover
    2. loop around the thread going from the signature to the cover
    3. go back out the same hole you just came in through ( “inside” to “outside” of cover )
    4. Come in through the furthest-from-spine hole ( “outside” to “inside” of cover )
    5. Nudge and jostle everything so that it’s as tight as possible
    6. Tie a knot & cut the thread! (wait to do this step on all the threads at the same time)


You’re done! 

Wednesday, February 13, 2019

Printing PDFs for tiny books

It's great being a programmer, would highly recommend it. So many things one can do when you leverage the power of scripting. The skillset helps you everything. For example, even with book binding! Say I totally, hypothetically, have some random PDF that you'd like to turn into a tiny book. Cool! How so?

STEP 1: PDF JAM!

The key to all of this is the pdfjam tool written by others far more talented than myself. That alone will let you craft your book, if you want to do it manually. Go to the linked page, follow the instructions, download & install it.

STEP 2: Grab my terrible script(s)

I have 2 sizes I like for my books... Both scripts print signatures that are 4 sheets to a signature, 8 pages folded, 16 pages front & back. Hopefully that make sense.

Option 1 is a 2x2 layout (so each page is 1/4th the sheet of paper) that can fold & nestle neatly. I like this and often don't cut the top pages apart until later. Often I'll wait till I sand/trim the top to separate the pages... Unfortunately I often find this to be "too big" for my tastes. But it's probably the easiest/most legible. [script].

Option 2 is a 4x4 layout (so that's a full signature per page) and really requires a tabloid size sheet of paper (11x17). I run my font really tiny, I suspect this is probably too small for most folks. The books I print this way are laid out specifically to be small, your average PDF wont be legible with this, even on tabloid. [script].

I'm just going to assume whoever is reading this is on a Mac because I can't help you with your Windows... but save the script (as a .sh file) and then make sure you can execute it. All this is going to happen on the terminal so... I hope you know how to work with that. I tend to choose "chmod 755 my_script_name.sh" to give it the correct permissions.

The script is going to ask for the PDF file name and how many pages it has. It'll then create a directory named "output_small" and dump all the individual (2 sided) pages created. If there was already a directory there, that'll get nuked. I wrote a terrible script and it can't handle page counts that don't line up with its exact layout so.... there's a very good chance it'll barf at the very end. It spews content onto the terminal and that last command will probably fail and you'll need to tweak it manually and execute it.... (Terrible, I know) Here's an example:


19:48 ~/directory/of/stuff>
19:48 ~/directory/of/stuff>chmod 755 ./small_book_pdf_jam.sh 
19:49 ~/directory/of/stuff>./small_book_pdf_jam.sh 

PDF file name:
jbic.pdf
PDF page count:
466
... looking at the following file:
-rw-r--r--@ 1 sithel  staff  1404186 Jan 26 16:22 jbic.pdf

Checking...
You will have 14 blank page(s) at the end
There will be 15 signatures
Dumping all old content from the directory 'output_small'
          ----
  pdfjam: This is pdfjam version 2.08.
  pdfjam: Reading any site-wide or user-specific defaults...
          (none found)
  pdfjam: Effective call for this run of pdfjam:
          /Library/TeX/texbin/pdfjam --suffix rotated180 --angle '180' --fitpaper 'true' --outfile output_small/temp_flipped.pdf -- jbic.pdf - 
  pdfjam: Calling pdflatex...
  pdfjam: Finished.  Output was to 'output_small/temp_flipped.pdf'.
Signature : 1 of 15
pdfjam --nup 4x4 output_small/temp_flipped.pdf '1,16,17,32' output_small/temp.pdf '4,13,20,29' output_small/temp_flipped.pdf '5,12,21,28' output_small/temp.pdf '8,9,24,25' output_small/temp_flipped.pdf '31,18,15,2' output_small/temp.pdf '30,19,14,3' output_small/temp_flipped.pdf '27,22,11,6' output_small/temp.pdf '26,23,10,7' --outfile output_small/temp_sig_0.pdf
          ----
 .... goes like this for a while, successfully, UNTIL!!! 
          ----
  pdfjam: This is pdfjam version 2.08.
  pdfjam: Reading any site-wide or user-specific defaults...
          (none found)
  pdfjam: Effective call for this run of pdfjam:
          /Library/TeX/texbin/pdfjam --nup '4x4' --outfile output_small/temp_sig_448.pdf -- output_small/temp_flipped.pdf 449,464,465,480 output_small/temp.pdf 452,461,468,477 output_small/temp_flipped.pdf 453,460,469,476 output_small/temp.pdf 456,457,472,473 output_small/temp_flipped.pdf 479,466,463,450 output_small/temp.pdf 478,467,462,451 output_small/temp_flipped.pdf 475,470,459,454 output_small/temp.pdf 474,471,458,455 
  pdfjam: Calling pdflatex...
  pdfjam: FAILED.
          The call to 'pdflatex' resulted in an error.
          If '--no-tidy' was used, you can examine the
          log file at
                  /var/tmp/pdfjam-sk2QxI/a.log
          to try to diagnose the problem.
  pdfjam ERROR: Output file not written
19:50 ~/directory/of/stuff>

You gotta' take that last command and then put {} for each invalid page number... given that I only have 466 of them it'd then look like: /Library/TeX/texbin/pdfjam --nup '4x4' --outfile output_small/temp_sig_448.pdf -- output_small/temp_flipped.pdf 449,464,465,{} output_small/temp.pdf 452,461,4{},{} output_small/temp_flipped.pdf 453,460,{},{} output_small/temp.pdf 456,457,{},{} output_small/temp_flipped.pdf {},466,463,450 output_small/temp.pdf {},467,462,451 output_small/temp_flipped.pdf {},{},459,454 output_small/temp.pdf {},{},458,455 (Gross, I know. Very embarrassing)

Now that you've got those signatures you can just print each file out individually OR you can pull one smaller script and run that to glue them together [script]. Just does some basic math for you and sticks 'em into one file called 'book.pdf' in that same directory.

See... it's... not that bad... I printed several books this way. There's a whole 'nother step where you wrestle with your printer quality, paper quality, text legibility and all that... but that's for another day.

Wednesday, March 29, 2017

Catchup Post...

I keep meaning to circle back and do a really nice fancy write-up like post about my Bookhead series. Really pull together the sketches and ideas and construction process... and I keep not. There's also the fantastic Intercon Q to review and reflect upon and that's over a month past... It's now almost April of 2017 and my last post was September 2016... Better something than nothing at some point...

I remain very crafty. I've switched most my posting to Tumblr though where I feel I can just drop a cellphone photo and little description. This blog is what I make it, I could totally switch to doing that here... but I have hopes of a bit more long-form content here. My Tumblr is just the snapshots of progress... So what progress?

Bookhead 1 Bookhead 1

October. There was a lot of time and effort spent on/at work. I had the initial idea of the Bookheads and quickly made the first and second. Knew what I wanted for the third but it took several months to finally wrap that up. Also participated in a Dali themed cooking event and worked on but never finished a Halloween costume idea.

November. I turned 33. I started on the 3rd Bookhead before getting distracted with life. Family reunion in Mexico, lots of tabletop gaming, first time hosting Thanksgiving. Being happy and social.

December. OMG, so flipping over-booked! Completed class 3 of 4 in the bookbinding series with the Center for the Book. Became obsessed with The Expanse series (book and tv show). Social life and games of the tabletop and board variety.

January. So much crafting. Started the month with a couple more tiny books and then spent the rest of it working on a series of glow-in-the-dark cyberpunk masks for Intercon Q. The masks consumed a lot of time. There was also the Edwardian Ball and being social. I love my friends.

Intercon Q rule bookIntercon Q rule bookIntercon Q rule book

February. Intercon Q! It was awesome! It was so much! I'm still processing/thinking about it. And then to celebrate being done with that and returning to SF and having free time Adam and I went on a hike... and I promptly got poison oak. Real bad. Real bad. I've mentally blocked out the 2nd half of the month, it was so bad. But I also finished the third Bookhead when I wasn't suffering too much. But so much suffering.

Bookhead 3
March. I've become obsessed with OpenGL ES for some reason. I'm really, really bad at it. I bound a book for the spec and am trying to read it but that's not improving anything. I'm attempting to improve my Android skills outside of work. I'm less happy at work. I'm really happy with my bookbinding and recreational Android programming. I started taking an Improve class with friends.

OpenGL ES 3.0 SpecOpenGL ES 3.0 SpecOpenGL ES 3.0 Spec

Soon it will be April.

I think the major take aways here are that I still really enjoy my bookbinding activities. I'm attempting to flex it as an art form and incorporate it into more things. I'm on a programming uptick but on a sketching downturn. Gaming (board/tabletop) remains important to me (I've started winning Race for the Galaxy finally! After yeeeears of playing) but I play less. My social circle has become predominantly female and I think this makes me happier. I'm feeling older these days but I'm also feeling more productive/focused in my crafts.

My Bookheads, silly and simple and only three as they are, represent a major milestone to me in that they're my first "set" or "series" of something creative I've actually seen through. Something "artistic vision"-y. I had an initial concept that I executed on and they came out approximately as planned. My set of 5 masks are also important to me for the same reason- though my satisfaction with them is not as strong.

Bookheads 2 & 3

While I don't exactly have another specific series planned, I do have several one-off projects in mind that I'm hopeful for. The short term goals are a book bug, some sort of graphical Android multiplayer game over Bluetooth, and maybe a circular story that crosses itself and is specific to is printing/binding.

Hopefully I'll post again before another 6 months pass...

Saturday, September 10, 2016

Feeling Bullish About Bookbinding

Why not make bookcloth on Saturday?

Why not make my own bookcloth? I asked myself this last weekend and realized there was no good reason not to. A pinch of Googling told me the basics- you get some tissue paper, you use some normal fabric, and you have a piece of glass to glue onto to provide a flat/smooth surface. Boom. That's it. Why had I not thought to try sooner?

Backing up a bit, let me just say I've been on a book arts kick. There was a series of books I bound a while ago, and then a couple classes I took at the San Francisco Center for the Book. And then I did a collaborative project with local Kelly and Sarah on the East Coast. We took Suko transcripts from yet another game and turn them into a book for her (vaguely coinciding with her birthday). Alas, my photos of the amazing leatherwork provided by Sarah were so horrible I can't bring myself to post them. Will get better shots from Suko and post them later. Extremely beautiful final product, primarily due to Sarah's elaborate leather cover.

That weekend I decided I'd get around to binding my copy of the book. I'm quite fond of the quote from Contact: "Why build one when you can have two at twice the price?" I'd sent Sarah two copies of the book and she returned the unused one when she shipped back the final product. For this binding I opted for a safe, normal binding. Nothing fancy, nothing flashy. Just a solid case for my copy of the book.

A modest binding

Adding to my library

It turned out reasonably well, given that the spine was quite poorly done. I'm definitely learning. Still learning. Much learning to do. Which means much more binding required. Practice makes perfect. So in addition to binding the Academie book I bound a basic blank notebook. I used exceptionally thick card stock in order to get a reasonable spine width without too many pages. The actual book contents were bound a couple weeks ago. A couple weeks ago I also went to the Center for the Book and cleaned up the Academie book, trimmed the blank pages, and cut the covers.

It was only this last weekend that I decided to tie everything together. Since my blank pages were shiny, I decided I needed some shiny cover to go with it. I found this random piece of shiny/magical looking paper at the bottom of a drawer (from my letter writing itch) and realized neither the grey nor the red book cloth I had on hand would compliment it. Rather than give up or settle, I realized my fantastic collection of fabrics (from my quilting itch) could save me. And they did. I whipped up just the right amount of perfect book cloth and bound the book.

Mermaid book

Of course I had just the perfect blue ribbon laying around (from my now constant visits to the local candy store). My hoarding habit pays off! Anyway, it came together nicely. I've had more than one person remark that it's like a mermaid book. My only sadness is that the spine/book cloth got a smudge on it the day I brought it into work to show folks. It lacks that pristine new look now and so I sadly don't think I can sell it on Etsy... not sure what to do with it... but am happy I made it!

Everything shines Odd highlights

Funny how if the light hits it right it looks quite green.... other times it looks a lovely blue.

Spent this Saturday binding yet another book. Will post photos of it later. So happy with this latest bout of crafting. Off to go try and write more prose now for yet another mini book idea... Am definitely looking for more things and reasons to bind something. So if you've got any material you'd like turned into a book, let me know!

Sunday, August 7, 2016

All this writing

Life has gone on. The burning wreck that was April bleeding into May has receded into the distance and with the turn taken in June, moving to a lovely new home, I can't even see it in the rear view mirror of life any more. Out of sight, out of mind. So with all of that out of mind I've new things and thoughts rushing in to fill the vacated space.

Old self portrait & new project pieces

Thoughts, thoughts, thoughts. A pile of pennies, each individually rather worthless but collected and marveled at none the less by myself like a child with a tiny allowance. Am unsure what to do with them. What does one do with non-actionable ideas and pondered upon questions? I write them down frantically and it makes me happy. My red notebook brings me joy when I simply lay my finger tips upon it. I feel like I'd like to clean up and share my rambling musings in some form but am unsure how to best do so or if it's even a good idea.

Cisco era sketches

But the important thing is that I've already recorded them for myself and in the end that is the only audience I can truly hope or expect to please or perform for. For some reason I thought these ramblings were a new phase, an exciting swell of new ways of thinking... But that's only because my memory is poor and my periods of actual Rebeccian archeology infrequent.

Cisco era notes

The move required me to fully uproot and transplant myself somewhere else, somewhere smaller and so I was forced to dig up and turn over the top layer of sediment and creation cruft. The churn kicked up many (all?) old sketchbooks and loose leaf doodles and assorted desperately collected gaming detritus. I had the thought today to perhaps prune some of the notebooks- plucking out the "good" sketches and discarding the rest- assuming many blank pages between them. Instead I got a kick to the heart and a rush of memories.

Cisco era notes

I flipped through two spirals from my time at Cisco, the pages covered in incomprehensible notes about FPGAs and clock signals and truly wandering sketches. I looked into my own youthful gaze, captured in scribbled pen during an evening ride home. The damn things are like paper pensieves.

Very old TODO list

Another smaller spiral had skinny lists of TODOs and interview notes from yet another job transition. Perhaps I could have done away with that one but it was so small and such a quaint little snapshot of crafting efforts that I tucked it back on the shelf. The next was filled with scribbled text- first pages of prose I have no real recollection of writing (but written with the correct tempo and chalked full enough of alliteration that I could identify it as my own). Then were angry rants and silly musings that felt like a grip about my throat. Those feelings forgotten suddenly back and filling me with indignation or rage or that (now less frequent) strong feeling of distance and alienation.

I have no memory of this Angry rant I remember

Finally (flipping backwards as I do and often write) I hit the block of notes for and drafts of letters sent to friends. Dear This. Dear That. Names I still know and message. Names I miss. Names I no longer reflect upon. I didn't read them (I hate dwelling on my written letters once sent- one of the primary reasons I prefer physical to electronic mail) but my eyes couldn't help picking out phrases here and there. Reading backwards I tried to guess (some times with a sense of dread) what name would be at the start. I put that book back on the shelf and declared myself too emotionally exhausted to dare peek into another.

Cisco era sketches

Later. Surely later. I enjoy writing things out by hand in order to think. Surely knowing that they will sit there patiently to return to, legible to me no matter how scribbled, is part of the reason I do so. I think so. I think. I think I need to think a bit more about it later... now onto chicken bones.

Always be writing

Sunday, March 6, 2016

Small magnetic single throw double pole circuit

Back when I was a wee lass I saw Jurassic Park and knew then I wanted to get into computers so that I could create special effects. When I was a bit older we were visiting San Francisco and I went on an Aliens themed "3D" ride around Fisherman's Wharf (or maybe it was in Seattle?) Anyway, I remember being blown away by the experience of the seats moving and air hissing and decided I wanted to do computer stuff that would effect the real world. Fast forward a couple more years and I was at UW, majoring in Computer Engineering with a focus on embedded systems. Fast forward a few more after that and I'm a web dev tinkering with JavaScript... whoops. Might have miss-stepped somewhere along the way... but my love of computers is sound.

I have an inkling of knowledge on how to do things In The Real World but it's pretty weak. Turns out EE is hard and intimidating. But my interest remains strong. This, combined with my experiences doing several Escape Room games and the delight I had playing in a friend's Harry Potter puzzle LARP has lead me to the obvious conclusion that I should organize my own escape game.

Settling in to craft

Happily we got a lot of rain this weekend here in San Francisco. Not only does it help the drought problem, it allowed me to stay inside most of the weekend coding and crafting. And boy howdy is there a lot of coding and crafting to be done for this project.

A majority of the project is computer systems/pure code which I've been chipping away at, but some elements are hardware related and I've certainly been avoiding working on them. I enjoy it! But... it's hard. Thankfully I made actual progress on one portion but also wound up scrapping a different portion after repeated failure. Lets focus on the positive though!

If there's a chance you'll be playing in the game (you know who you might be, my so few Readers), I'd recommend not reading the rest of this post.

Not even half of what I needed Failed ideas

The goal: Have a surface that players can place an object on. The object has several magnets embedded in it, which activate switches below the surface when aligned correctly. The switches are attached to an Arduino which informs the computer, which informs the game server, which then has an effect on the game.

Turns out the end portion of it- the Arduino talking to the server is suuuuuper easy given the pySerial library. So the question here is about the circuit. Magnetic switches in a small space. Not difficult, right?

First attempt: run a wire to a bent paperclip, tape the wire to the hidden "floor" below, and use the wire as a hinge. Have the "surface" above be wrapped in tin foil and ground that. Now the wire runs to an Arduino pin in `INPUT_PULLUP` mode. Boom! Done! Success! When the magnet moves above the paperclip, the paperclip jumps up and grounds itself against the "surface" above and you've got a closed circuit!

Problem: There's only a couple pins on the Arduino and I'd like there be be a number of sensors so that different configurations can be recorded. That means each sensor circuit needs to ground 2 pins so I can have more unique combinations (That's multiplexing... right? Maybe?)

Next attempt: ... somehow close 2 circuits with a single paperclip's movement rather than just 1 circuit.

Problem(s): The paperclips I bent all had a single point of contact where the magnet was. The wire hinge was a bit too ridged/constricting to allow smaller pieces to rise and fall. I tried many different shapes and sizes and padding/fringe along the top of the paperclip that contacted the surface above. The signal was finicky, rarely closing both circuits.

Not really "success," but acceptable

eventually... "success!" (the signal is still a bit finicky, but good enough to go forward for now)

The solution? Have lots and lots of craft items laying around your house... No, really. The solution? conductive thread & copper tape

Conductive Thread : something needs to hold the paperclip to the "floor", allow it to pivot, and make sure it's connected to the circuit. Wire hinges were proving to be too ridged along with folded tape or aluminum foil. Enter the ever magical conductive thread. Taking two strands and tying them to the paper clip solved this problem. The clip was bent to be flat along the bottom, one strand tied to each corner, then the strands taped down with masking tape. It was a smooth hinge and a reliable connection. I wrapped the floor with aluminum foil and grounded it so that each paper clip is grounded via it's conductive thread tie downs.

Copper Tape : originally acquired for stained glass purposes, it's great. One side sticky, one side copper & conductive. Note that the sticky side is not conductive (sadly). I used this to mark out the traces on the bottom of the surface, where the paperclip would connect to. The tape is already pretty thin but I was able to cut it in half and place very close to each other- like laying out a sticker circuit board. I cut the paperclip to be U shaped, anchoring it to the floor at the bottom of the U. Now when the clip jumps up towards the magnet and closes the circuit, it has 2 little points contacting the 2 different traces (rather than one broad one).

Wednesday, January 27, 2016

Gaming Craft

I like gaming. The social aspect is fun, yes, and story telling, but it's this whole crafting/art project portion that really hooks me.

As I've aged I'm finding it a little harder to just make things willy nilly without thought as to why or for what purpose. I've tucked about as many little monsters about the house as Adam will let me. I've given ones to many friends and all family members. Why make more things? Well, making things is FUN! But... why? That's where gaming comes in. Now I'm making not just "something" but rather a prop or an accessory. A visual aid for something that involves more people than just me. Purpose.

D & D : Prep is fun

Up until this point I've mostly been playing in games but 2016 is the year I dip my toe in trying to run them. Picked up the D&D 5e suite of books/rules and have run 2 little one-shot games for my friends. Wouldn't say they've been that successful but I've definitely enjoyed having friends over and having an excuse to think creatively. The first game involved a 2 level map where I drew the ground on graph paper and then had a tree branch level drawn with dry erase markers on a glass shelf (resting on several cardboard tube tree trunks). The second involved a dungeon map slowly revealed as people explored it.

D & D : ready for that dungeon crawl

Turns out peeling off square by painful square of "fog of war" isn't super fun. Also, candy colored "fog of war" really doesn't add to the "dungeon crawl" vibe... The problem wasn't the taping down (that actually worked super well) but just the general scrabbling for a hold on tiny paper piece in order to pick up. One takeaway from it though was that drawing the map was a good exercise in thinking about the story and helping me build out an idea. Drawing is my best way of building a narrative- something I've known for a while.

Rogue Trader : Homework

Another delightful gaming craft recently worked on was the Rogue Trader Yu'Vath Battlestation Assault Plan. Given a rather math-y description of a patrolling ships around a point of interest, friend Nate and I wrote a little simulator to help find the best approach. Mind you, this is for a game I'm not even in. Was thrilled to have a valid reason to use the three.js library again and limber up my mind, wrapping it around 3D math/space/modeling. Not sure how long Nate will host it for, but the simulation is up at this site right now. [code posted on Github]

Monsterhearts : The PCs
While not really a craft, I've found games (mine but especially others') to be an excellent source of sketching and art. Friend Kelly drew the characters from a game and then flattered me by asking to help with inking/coloring it. I appreciate that with her effort/interest/involvement I managed to overcome the wall of white space most my sketches hang in and provide the vaguest of something for background (drawing backgrounds being my majorly failed 2015 New Years resolution). Never mind the fact that it's mostly a munged photo I found on the Internet...

I was going to follow this up with several more gaming sketches but alas this week's plot didn't get far enough...

Named arrows fly better

Along the gaming craft tangent: applying game content to other activities. Friend Suko and I continue our once-a-month shooting. I've marked my arrows with names of 4th Terminus characters and not only does it help me improve my aim/track my shot history but it also tells a story with every round. "Oh Hayley, once again going off target. Morgan, always flies true. Jayce, right where I send him and look at that- the Jaya arrow is snug up against him. Again." What I need to do now is figure out a better way to label the arrows. Right now I've scribbled the names on the nocks (over half of which need to be re-aligned) but the ink rubs off so easily there.... Anyway, the important take away is that once I named my arrows and could track which offset/corrections were needed for each I was able to hit the bullseye three times with the arrow named Jaya. Just saying. The other arrows need to start pulling their weight.

In conclusion gaming is fun. Friends are great, telling stories with them is a fantastic way to pass the time, and using said content to overlay on other actives makes everything better.