Sunday, November 29, 2015

A Quite Thanksgiving

Indecision Pie

Thanksgiving this year was a medium sized gathering in the South Bay with friends. No family, mine being scattered about this year and all the girls lacking the freedom/time to travel. Alas. Looks like Christmas will also be Steckerless for the most part.

My contribution to this year's meal was potatoes and pie. My much anticipated (by me) purple potatoes and coconut cream (aka vegan mashed potatoes) was an absolute dud this year. I blame the potatoes. The pie however went well. Earlier this year I had a pie crust near-fiasco... which is ridiculous now that I look back at it because I have/had a food processor. Used it for the first time to make pie crust and am never going back.

Indecision Pie Progress

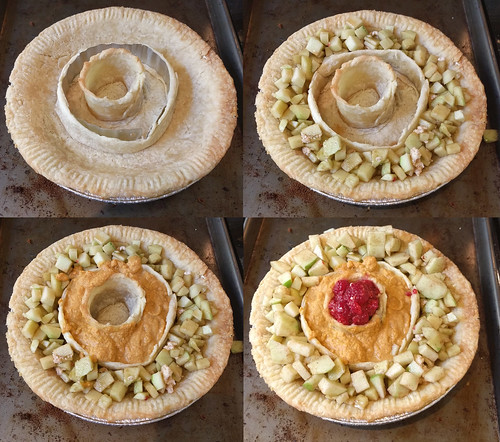
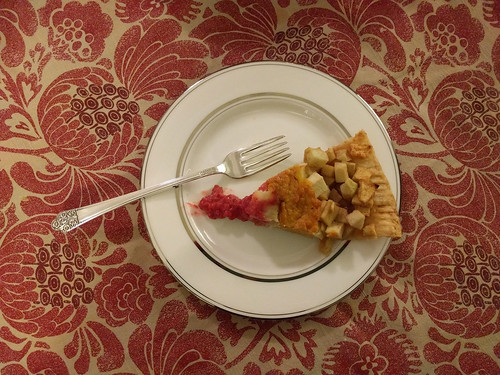
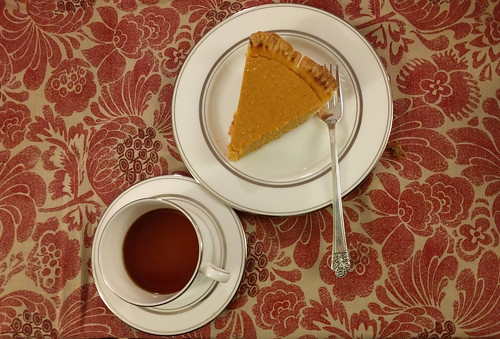
Adam made Pumpkin Pie to ensure a reasonable dessert was available. I couldn't top the Venn Diagram Pie of years previous but thought hard to come up with something fun. Wound up with Indecision Pie. I used scrap aluminum (from a project waaaay back when) to create structural supports for some concentric circles. Blind baked the crust with only the inner circle for the first 12 min since that has the foil & pie weights portion. Removed foil & weights and added super-thin outer circle and cooked another 15 min. When it came out of the over I removed the inner support right away (no problem) but the outer support I left in place until I filled the apple section because it was likely to topple if left alone. Middle portion was left-over pumpkin pie and some raspberry filling ended up in the center.

In hind-sight go apple, raspberry, pumpkin next time. Apple & pumpkin: that's a no.

Thanksgiving Tarot

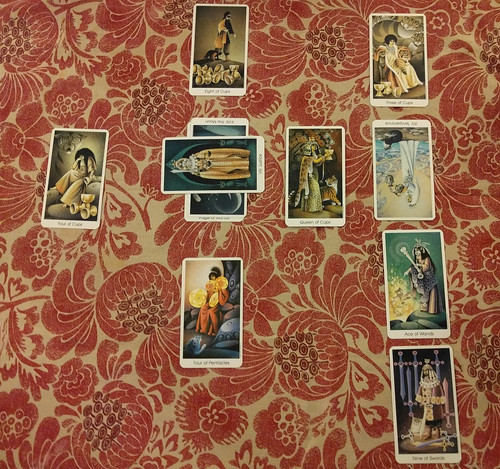
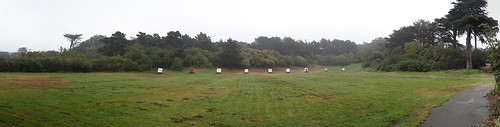
After dinner there was some tarot reading for some folks and one of the dogs. Amusing and silly. Sadly no one in attendance actually knows much about the cards so every step of the way required flipping back and forth through a book. There was also an I Ching reading/toss(?). There was also a walk. A fine tradition, that. I love the post-Thanksgiving meal walk, wherever it may be or go.

Traditional Pumpkin & Tea

Many things to be thankful for this year. A year of changes for myself and many around me, most (all?) of them for the better. Lots and lots of new jobs, I gained a brother-in-law, there was another Dr. Stecker in the family (for about 2 weeks before she went and got married and took his name- ARRRrrrggg!) and if things All Go Well there will soon be another one (who will keep her title/name pairing). I am thankful that these job changes have been for the better. That I've been gaining family and not losing it. Relationships starting and deepening rather than fraying or ending. I retain my health and others appear to be doing well (except perhaps for the dear Grandmothers). In fact my health along several different axes is in a much better state now than it was this time a year ago. The world at large seems to be becoming more hostile and dark (though perhaps that's just my age tinting my world view) but I am thankful that my life appears to be trending the opposite direction. I'm meeting more people who I find enjoyable. I'm continuing to add to the "things I can do" pallet of possibilities.

Life is good.

Monday, November 2, 2015

Getting 8 pages from a US Letter page

This is one of those things where I'm sure the answer is clearly posted somewhere on the Internet... and I just really couldn't find it. So I'm typing up my solution here in the hopes that the next person who looks for the answer can more easily find it.

The problem was simple- I have a single piece of "normal" US Letter paper. I wanted to get 8 pages (4 per side) out of it. I also wanted the page to be part of a signature, which meant the layout of the pages wasn't just 1-4 on one side and 5-8 on the other. What am I printing? I'm printing a PDF of N pages. It happened to be generated by LaTeX but that shouldn't matter for this really.

So, how? Easy- use two command line tools pdf180 and pdfjam. The pdf180 command is required to flip the pages upside down so that they're right-side up when you do the first fold (which will later be cut open). pdfjam is required to correctly tile 4 pages per side of the paper so they're in the right order when you do the second (spine) fold.

That means a simple, single page would look something like this:
# assuming what you want to print is named MY_STORY.pdf
pdf180 MY_STORY.pdf --outfile TEMP_FLIPPED.pdf

pdfjam --nup 2x2 TEMP_FLIPPED.pdf '1,8' MY_STORY.pdf '4,5' TEMP_FLIPPED.pdf '7,2' MY_STORY '6,3' --outfile LAID_OUT_STORY.pdf

You now have a nicely laid out LAID_OUT_STORY.pdf to print and a TEMP_FLIPPED.pdf file you can delete.

That's all cool... but what if you're trying to print, say, a 445 page document? And you want to use 4 pieces of paper per signature for a total of 32 pages, front and back? That requires... PROGRAMMING! So I wrote a script which you can find over at my GitHub repo: signature_creator_32.sh. There's also the 2 pieces of paper/16 pages total, front and back variant: signature_creator_16.sh. If I were a not-lazy programmer I'd have written a single script that could dynamically take how many pages per signature. Oh well.

Disclaimer: the scripts don't handle missing pages at the end of your document. It does notify you if it's expecting blank pages, but what that really means is that it'll crash on the last pdfjam call. Just copy the command printed to the terminal and add in {}s instead of pages numbers that exceed your page limit. Again, if I were a not-lazy programmer I'd have written that in too, but bash scripting was... icky.

What this gets you is a new folder called output (careful! all content in existing output folder will get deleted!) filled with files temp_sig_1.pdf, temp_sig_16.pdf, temp_sig_32.pdf... etc, the number being the first page for that signature set.

So now you have as many files as you have signatures. That's obnoxious if you want to take a thumb drive to Office Max or something and have you print 3 copies of the book. So there's a second script called glue.sh that you can run and it'll reach into the output directory and squish all the temp signature files into one file called book.pdf. And that is what you print.

Warning: if you go to the last page of the book.pdf, don't freak out that it doesn't have the last page of your original document! Remember, the signature is folded so the last printed pages will actually be some 6-12 away from the actual "end" of your book. I forgot this fact once and spent nearly 5 minutes having a heart attack thinking I had printed four copies of the wrong file.

Great! Now you have a stack of paper with your content printed on it! In the case of my 445 book that means 56 pages that need to be folded into 14 signatures.... and heaven forbid you get those pages out of order. Even with them being in order it takes a little bit of a mental warm up to ensure you fold them correctly. And so, here's an animated image and some basic steps to take in order to fold correctly:

  1. Ensure the lowest page number for the signature is in the upper left corner (upside down)
  2. Take page off of stack and place it "face" down, landscape. Lowest page number now lower right, face down in front of you.
  3. Hamburger fold the page, left side atop right. You can verify correctness by ensuring page numbers are consecutive inside the fold. Lowest page number still face down. Press edge with bone folder.
  4. Set aside. Repeat steps 1-3. You can be certain things are aligned correctly when the page number offsets of lower top page are 4 apart. They increase 4, 8, 12, 16, 20, 24, etc. Looking at the ones digit it's easy to follow the cycle -> 4,8,2,6,0,4
  5. On your 4th page stop. You'll know you're done with this signature set because after the hamburger fold in step 3 the to page should have consecutive pages. This is the middle of the signature.
  6. Use a knife to slice half the fold on each piece of paper- be consistent on which half you cut. Don't cut the rest of the fold until you're done with stitching the spine. If you're going to use a guillotine, just let it deal with the fold. Brace against something flat, fold, and press! Voilà! Now you have a signature!


Final note: since I used LaTex, here is what my page geometry looked like for the original PDF generated:
\geometry{
     a5paper,
     % due to the folded nature of my printouts, and the
     % failure to scale the paper correctly the bottom
     % and non-bound margins have extra space. The top
     % and the bound margin are expected to be the
     % specified offsets here.
     bottom=4mm,
     left=2mm,
     right=2mm,
     top=20mm,
     bindingoffset=15mm,
}

That's what I printed. And things looked great! And then I stitched my 14 signatures together and some skew crept in. And then I used the guillotine and came within a hair's width of losing content on the top and bottom. I didn't! But it was waaaay to close for comfort. Will definitely be adding 5mm to the top and bottom margins next time around.

Final final note: I used \documentclass[10pt]{book}, \setlength{\parindent}{5mm}, and \setlength{\parskip}{4mm}. It's tiny, but legible. Definitely don't go smaller! A little larger would probably be nice but I couldn't afford to bump the book length any longer than it already was.

Sunday, November 1, 2015

Completed: Book binding

My five editions of the first two volumes of 4th Terminus are done. An epic (for me) feat started just after I quit work (July 15th) and completed almost three months later (October 7th).

All of them done & paired

Many many thanks to both friend Suko for her copy editing time & efforts and friend Scott for the inspiration & assistance on the binding project overall. Scott has been into book binding for many years and was good on his promise of helping me out when I finally found something I wanted to print & bind. Of course, I think original promise was to assist with "a book" rather than a printing run of ten at once. Luckily Scott is the right kind of nerd in all things and seemed to enjoy as much as I the challenges & differences unique to mass production.

No irrecoverable mistakes were made! Really, the only goof was that I should have affixed my end papers BEFORE I pasted on the crash. Instead, I wound up hand trimming them and adding them in just before the covers went on. Smoother gluing of end papers to cover and better shoulder position/size would have helped things, but I assume I'll just get better at that with practice.

Cut once, measure DEAR GOD ONE MORE TIME! Dramatic differences + smudge
All lined up

The guillotine cutter was magical and made my lame hand-bound signatures transform into some professional looking content. It also left behind little black smudges on my beautiful white paper. Luckily Scott and I had already been discussing the idea of speckling the page edges- the smudges just made it a requirement. Purple & black were selected for reasons and did an excellent job of hiding the blemishes.

Looks like official paperbacks Obfuscating those smudges

Scott bravely operated the foil heat machine, facing down a number of hiccups/problems. Turns out the foil and the book cloth don't mesh well. Maybe next time leather is needed? Regardless, all of the printings look great and really gave the books an old library book vibe. Which is good.

Foil machine The best pair

Turns out mass-producing books takes TIME (especially when we're semi-figuring things out as we go) so after the cloth was printed & covers were cut, Scott and I parted ways as our time was up at the the Center for the Book. Great place, that. Will be going back again for classes. Knowing what I know now, will be much faster/better prepared when renting equipment/space/time in the future. Anyway, it meant the cover construction and assembly happened at home, unsupervised. I think it went pretty well.

Getting close Covered cover The queue...

I wound up gluing most the covers on at the session in which I handed the books out. Time management. It's hard.

Knowing what I know now, I'd say the steps for the next run of books I do will be as follows:

One of my main regrets was that I didn't take better photos throughout the process. My phone camera is pretty weak-sauce. Luckily friend Suko took some excellent photos of her books! (and if you follow either of us on other social medias, you're probably sick of seeing them over and over by now) Re-posting them here, with her permission, for prosperity:

Suko's copy An interior shot Suko got the best endpapers

Sunday, October 18, 2015

Completed: 4th Terminus quilt

The quilt is done and has been out of the house for over a week. Success.

This is the first quilt I have "finished" the quilting for and put through the wash. Yikes, what a heart attack! I was not prepared for the state it came out of the wash in and almost burst into tears. Turns out A) quilt batting holds a fuck ton of water and B) light colored fabric is SUPER transparent when wet. Thankfully one of SF's little mini October heat waves helped shed the water and the fabric returned to it's opaque state upon drying. Those first couple moments though... All the track stitching was done in red and while I clipped the threads, I didn't trim them back as short as I should have. Which meant that veins of red creeped out from the tracks when it was wet and all the character portraits had spider webs of black thread behind them.

Quilting

I'm shocked to say the quilting process was rather fun. And this is the first time I've abandoned the use of a frame and just quilted in my lap. Would not do so for the primary stitching lines that holds everything in place (yay for having a quilt frame for that!!) but for the "filler" stitching, it worked well. While I continue to swear that "the next time" I'm shipping the damn thing off to be machine quilted by professionals, I do find it to be quite appealing to add custom stitches specific to the quilt design. Used masking tape to help guide the lines, and that proved to be very useful. Have also used masking tape to guide applique sewing (because I suck at pinning), so that stuff is turning out to be a vital to have on hand.

The bare minimum Quilting

The back of the quilt was more complicated than it needed to be/should have been. For some reason I thought "Wow, this is waaaay too nerdy looking! It needs a stealth mode where you can flip it over and it doesn't look so... silly." So I did some minor slap-dash squares in a variety of fabrics. The rushed sewing job (and non-cotton fabric types) meant that it didn't lay perfectly flat, which became most noticeable when the quilting chased down all those wrinkles and pinned them in place. Oh well. This will be yet another flaw lost in the sea of detailed-stuff-going-on. On the up side, the station stitching clearly shows through the back of the quilt which I find to be quite fetching. Makes the effort of hand stitching such details more worth it.

Quilt Back

And now, don't make fun of me, I'll confess I've started a sample square as a proof-of-concept for next quilt*... Poor Adam was a bit sad to see the 4T one leave- it's one of the few I've made that was large enough to cover him. So we talked a bit and kicked around a very Adam-specific idea that I'm pretty excited about. And again it's overly complex, very specific, will take forever, and will probably require hand quilting... I'm so excited!!

* I have not forgotten that I've plans for another 4T quilt for another individual! But that one actually requires the game to end before I can start on it so this one is... like... an exceptionally complicated palate cleanser...

Quilt Top

You can check out more photos over at the Flickr album.

Saturday, October 3, 2015

Winding down

So I'm fast approaching the 3 month mark of being unemployed and things are winding down here. I've already begun the process of finding new work- have applied to a number of places already. Am targeting Nov. 9th for a start date. Fingers crossed that I can a company that both interests me and wants to hire me. Am never able to escape that Woody Allen joke "I'd never join a club that would allow a person like me to become a member" in terms of work though...

Yet another sunset photo

In terms of the things winding down: I'm excited that most my projects/goals/objectives of this hiatus have been met or are very near the finish line. Other than claiming I was going to do TWO quilts rather than just one (because I'm an idiot), I feel I've done an excellent job of scaling my ambitions to my expected available time. The quilt is essentially done, just needs some more superfluous stitching and a wash. The books are going to be finished come hell or high water. I've learned to cook chicken a number of ways (some of them even fast and easy!) and feel rather confident I could prepare a "meal" on the fly now after work without excessive stress or research. I've got 3 branch libraries to hit and then I'll have tackled 'em all. I had an excellent run of 5+ mile a' days there and don't feel guilty or bad that I've slipped back down to a steady 3 miles a day because I want to, you know, DO THINGS during the day and walking takes a hella' lot more time than initially anticipated.


(I dehydrated a hard boiled egg. I DO NOT ADVISE IT)

I guess the main let-down of this whole extended vacation was I failed to advance my drawing skills. I had hoped to tackle landscapes and I've made not a pinch of progress on that these 3 months (or past 10 even- it was one of my few resolutions this year). I also failed to attend any sort of fitness bootcamp nonsense thing, which I never really seriously considered but had always faintly hoped I'd do given sufficient free time. Maybe three months just wasn't "sufficient" enough, 6+ months off and I'm sure I'd get around to it...

In terms of other, just general awesome things:

  • Saw the whole blood moon eclipse thing. Happiness.
  • Went to the SF Super Hero Street Fair with company. Had a drink even! Danced with Santa. Was swept off my feet by random silver spandex man and made very happy. Good times.
  • Finally took another stab at hard crack sugar. It went better this time. I am emboldened.
  • Suko and I have not yet abandoned archery. This makes me proud of us.
  • I got a calligraphic letter from Katie in the mail, and it wasn't even a reply to something I'd sent. Just outa' the blue. So nice!
  • Enjoyed opening weekend at the Petaluma corn maze. Highly recommend it.

  • Friday, September 18, 2015

    The delights of excessive free time

    This week marks two months since being unemployed. Utilizing my boundless free time, I went to Golden Gate Park on Monday.

    Golden Gate Park

    We in SF have had a long stretch of ridiculously good weather. Monday was the first real day that broke. Perhaps not the best day to visit the park. It wasn't really raining, but Karl the Fog was hugging the park really, really tightly.

    So much space!

    On the up side, it looks like shooting mid-day mid-week should be entirely doable! The archery range is neeeever that open on the weekend. There was just one individual with a super tricked out bow, shooting by his lonesome. Anyway, after wandering about a bit I decided another day might be better. That day was Thursday.

    Golden Gate Park, take 2 SF Botanical Garden Highest Point

    It can be rather breathtaking, how beautiful the park can be. There's a many a thing to tease SF about or sneer at... but one cannot deny that our park is wonderful and we are all lucky? blessed? to have such easy access to such lovely landscape. Too bad I rarely make it out to that side of the city.

    Took a pleasant stroll on my way out through the SF Botanical Garden, which is free to visit if you're a resident! My favorite paths wind through the Australia section, but the entire grounds are delightful. Just be careful- the grounds are so peaceful and calming and restorative that many an individual is inspired to friendliness and chatting... Avoid eye contact!

    Epic good day

    Was also able to visit two more ocean-ish library branches this week, bringing my total up to 21 of 28. So far Ortega remains the nicest due to it's views but everything gets better the further west in the city you go. Nothing can compete with the catalogue of the main downtown library though.

    Main Library
    The library is full of books

    After all that, I started the binding of my quilt and then went over to a friends house for movie, food, and great company. Life is good. Friends are awesome.

    Monday, August 24, 2015

    4th Terminus Quilt aka Decision Fatigue

    While snapshots of quilt progress have littered my Tumblr and it pops up frequently in conversations about what I'm doing, I apparently failed to blog about it here. Given that I finally started the quilting part this last week, I figure now's a good time to do so.

    Quilt Sandwich!

    The project has been percolating in my brain for a while, not sure exactly how long. There were many motivators/reasons behind it:

    • I was on the prowl for a new quilt project. I apparently need a very personal, focused reason to work on one (the Scrabble Board quilt and Pythagorean Theorem quilt remain unfinished- not abandoned but decidedly low low low priority)
    • Nate said the game was going to end this year and I thought it was worth commemorating
    • I've known about Spoonflower since 2008 and have just been waiting for the perfect project to come along so that I could try them out
    • I love generating artwork for the games I play
    • I've long desired to have more practice/reason to embroider phrases. My font is kinda' ugly, but whatever. Still learning, practice makes perfect.

    Iconography Print Medical Print Science Print Gun Print

    Looking back over posts and emails, the timeline looks approximately like this:

    • Late 2014, I get it into my head to do a 4T quilt featuring the transit map and the character silhouettes I've drawn
    • Jan 21st 2015, pestered Nate till we got a revised/blessed/final take on the transit map. Posted to Tumblr.
    • Early February 2015, pulled both Suko & Nate into the project for feedback/input. Good decision.
    • Late March 2015, started designing first pair of custom prints. Posted to Tumblr
    • Mid April 2015, designed final pair of prints.
    • Late April 2015, decided to undertake the task of embroidering every chapter title for boarder. Posted to Tumblr.
    • May 3rd 2015, first test yard of fabric arrives. So strange to see digital content brought into reality. Posted to Tumblr.
    • May 28th 2015, bulk fabric order arrives! So much pretty, all of my choosing! Posted to Tumblr.
    • May 31st 2015, cut and sewed the blocks together. Then settled into the long slog of embroidering all the chapter titles. Posted to Tumblr.
    • July 29th, 2015, buckled down and did pile of work, most notably sewing down the transit line. Posted to Tumblr.
    • August 21st 2015, finished back, slapped some batting between the piece, and started quilting! Verified that, yes, my stupid bulky quilting frame is actually exceptionally awesome/useful. Posted to Tumblr.

    So exciting!

    It has been a fun and educational process. It also has been extremely exhausting. Every fucking step along the way has been a decision point. Which fabric color to pair with each chapter title? Which color tones to use for the prints so they are visible but not too attention-grabbing? Which shade of red? Which shade of purple? How wide to make the lines? Which characters will stand next to each other? Which chapter titles will surround them?

    See the idea come together

    This number of decisions and their continuous nature (as opposed to all being resolved at the start) differs greatly from my (admittedly little) quilting experience so far. Now that I'm onto the quilting bit, it feels as if a weight has been lifted. There are very few decisions left. Before me now is just the clear, uncomplicated work of stitching along lines that I have already decided upon. I remain happy, but am glad to have finally clear the worst of it.

    Making it happen

    The take aways from the project so far:

    • Let it go. Just decide on something. Something is better than nothing.
    • Spoonflower is great! Higher contrast produces better results.
    • Wash away fabric pens were kinda' a let down. Wound up using mostly white charcoal art pencil to outline most my text
    • Rotary cutters FTW. We already knew that. Never hurts to repeat great advice though. I finally upgraded to a super-large cutting mat. I feel like a grownup.
    • Always buy more solid colored fabric than they think you'll need. It never hurts to have too much and it hurts A LOT to not have enough.
    • I don't like the long-stitch/split stitch font I chose for my chapter titles. Next time I want a smaller back stitch for my text. (something to keep in mind for the Pythagorean Theorem quilt)
    • I invested in those plasic perfect circles for my station dot applique. No regrets. They didn't turn out perfect, but that's my fault I think. Next time I need a smaller running stitch when basting around the edge, for the gather.
    • Adam is a good sport for letting me litter so many craft supplies about the house for this, for so long. The drying rack has been in the TV room for several months now with the chapter titles and fabric prints draped over it.
    • Learning how to make repeating patterns in Photoshop makes me happy.

    The quilt top

    It's just... really, really exciting to have an idea in my head spool out so damn slowly and yet stay as I envisioned it. It's just a collage quilt, but it's a project I'm proud of. Few endeavors strain and stretch my creativity in so many different ways, it's a feeling I highly value.

    Monday, August 17, 2015

    1870: The Board Game

    Resource management games can be found on both computer and on the board. I prefer the board variant because there's a limit to how much time you can sink into it before the game ends. Yes, I've had a couple Civ video game binges, but I never come out of those feeling good. And while you can video game with friends, it's better in person over a board.

    1870 sort of puts this to the test. Unlike other super-long board games it doesn't overly rely on randomness (Risk) or excessive politicking (Diplomacy) which I'm no good at. It however far exceeds any normal board game in duration. How far? I've no idea. We've tried to play it twice so far and after 6+ hours each time we've yet to reach the end. We've yet to even really get the end in sight. Rather than infuriate me, I'm more determined than ever to play it through (and win, damnit! I'm a winner. Things are gonna change, I can feel it.)

    One of the best things about the game is the ridiculous complexity that all sort of makes sense. It seems like half the game is just learning and remembering the rules. Towards that end I whipped a cheat sheet for our second attempt this last weekend.

    They're meant to be 5.5" x 4"- here's the Google Doc Cheat Sheet that has them laid out 4 a page.


    Above is the "Operating" phase, below is the "Stock" phase (aka, excellently named the President and Person phases by Allison)

    Why is such complexity tolerable? I'm not sure. Maybe once we finally reach the end I'll throw my hands up in disgust and come to the same conclusion that I have with Power Grid. Why play resource management games at all? There's just some sort of itch that it scratches... the idea that it can all be done correctly. Both times I've played so far I feel like I failed not due to a bad draw or poor luck or because someone was uncooperative (try as some might to be a thorn in the side), but rather because I fucked up. And if I fucked up that means maybe next time I wont fuck up and then I'll win. And then I'll have won because I'm a winner and I did it best.

    But who knows... maybe next time we'll actually reach "mid-game" phase and I'll be able to get a better read on things. To give you an idea of how little progress we made, here's two pictures from our first game.

    They're almost 4 hours apart. Can you see how not-covered by tiles that board is? Yeah. Next time... or maybe the one after that...

    Interested in the rules? Check them out over at the publisher's site.

    Friday, August 14, 2015

    Extracting comments from Google Docs

    One of the best parts about Google Docs is the whole easy-to-share aspect of it, which includes an excellent commenting system.

    Google will happily let you export your document, but this extra info is harder to get ahold of. From the drop-down menu you can currently export your file as: PDF or RTF (has formatting, lacks any comments), TXT (has comments, lacks formatting), or HTML (has comments and formatting). However, check out what the HTML output looks like:

    That's really close to what I want, but it lacks the highlighting to indicate exactly what the comment is referencing. Or does it?

    Here I've marked up all the <p> tags with a green border and all the <span> tags in blue. You can see that there are spans wrapping the formatted text, but also where the highlighted text would be. Most notably, see how "obnoxious" is split across two tags.

    Unfortunately, there's no markup in the <span>s themselves to indicate which comment it goes with. There's the tag/link right after it, which will have to be enough.

    <sup><a href="#cmnt1" name="cmnt_ref1">[a]</a></sup>

    But now, how to tell how many of those previous span tags, working back from the link, is part of the comment? For that, you gotta' lean on the Google Drive API. Specifically, the comment's list endpoint.

    Look at that! It even has the user who made the comment and the timestamp. All we could ever want. It also indicates there was a reply, which the [b] comment is. The important field it has though is context. It doesn't tell me *where* in the document that context is (that's okay, we've got the HTML) but it does tell us how much of the content the comment spans.

    And that's it. Well, the basics at least. From there, it's a bunch of corner cases about character escaping and sticking together the spans the right way so you can match the context string. Haven't ironed all those out yet, myself.

    For some specific examples (and some gnarly code) you can checkout some segments of my project on Github, specifically grabbing file information, content, and comments and pairing comment with highlighted text in a very brittle way.

    If there's a better way to do this, I was unable to find it and would love to hear about it! Seems odd that it was this convoluted... am likely missing something.

    Thursday, August 13, 2015

    One Month In

    So I've had a month to myself now. Have I squandered it? Probably. Lets review:

    Visit all the public library branches in SF.

    Am at 10 of 28 now.
    Library Progress : 1
    I've picked off all the easy ones, they're just getting further and further away from here on out. Mostly the western half of the city left, with a few far north and south to check out. I still believe it's a good idea, gets me out of the house. I've discovered that the Teen section of the library is much larger than I thought/remembered it was. There's apparently a non-trivial section/genre called 'Urban Teen' that I've never encountered before. Also, the graphic novel section is pretty neat. And there's a *lot* of romance novels there, more than I even expected.

    Today I flipped through Emily Post's enormous Etiquette book. It was fun and enlightening.

    Try to walk more than 5 miles a day.

    Working out reasonably well... Travel had an impact, but I'm not beating myself up over it.
    Fitbit Data
    One thing that I find particularly interesting is that it's not so much that the distances increased that much (I used to walk to and from work, and then frequently out to dinner or activities), but that the "active time" is what most noticeably jumped up. Even sitting at home crafting or cooking, I'm moving around around so much more than when I sit and code.

    Finish piecing/appliqué of quilt so I can start actually quilting it (and taking it with me when I travel).

    Quilt progress continues, slower than I'd like. But it is progressing. There's just so much work to do. I still have about 7 station dots to sew down. And two track bends to correct. And some more border to piece together. And then the whole thing to assemble. And then the back to assemble. And then the quilting can begin. And then, yeah, there's that whole second quilt I'd like to kick off real soon here. Hmmm. Quilt progress, as it comes along, can best be tracked via the #quilt tag over on my Tumblr.

    Wrap head around food/cooking.

    Eh, going reasonably well. I cooked chicken for the first time ever in the oven. Pathetic, but at least I'm trying to correct the situation. I made some super awesome sourdough bread using just starter recently. Sour and chewy and delightful. Am going to take another stab at it soon.
    Super tasty sour dough

    Draw more.

    Fucking failure. A huge gaping hole in my pretty picture of intentions. I don't know what's wrong with me. I've sat down several times, both at the Cintiq and with my pencils. Aside form Dr. Sketchy's, I've not been able to produce anything. It's getting to be a little disturbing... Not tracked in inital post, but worth mentioning:
    • Code for fun : going quite well. Have been really enjoying my Google Doc-to-LaTeX document converter project. Will make a stand alone post for that soon. Just got set up today (Tuesday) to run sutro.fm locally so I can start working on that again. Gah, I've forgotten how much I for (no good reason, really) dislike Backbone. Also, after bumping into a swarm of ex-Rdio co-workers, one after another, I feel an urge to clean up my animation patch for Thor. There's also some inventory management system project mentioned in passing by Logan and the joke-but-maybe-not-a-joke idea of contracting for a friend. And finally I'm starting to bump into enough minor nits that I don't like about Stalk like Stecker that I might need to re-write it.
    • Be more social : Seems to be going reasonably well. I have friends. They're pretty fucking awesome. They'll even hang out with me some times. There are things on the calendar. A number of them. I'm excited. Will post separately about it so as to not forget. Remember, future Rebecca. Life and friend can be good.


    (written Tuesday night)