Spoiler Alert : This is what this blog post is about
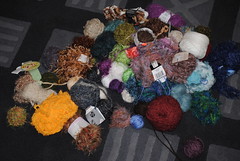
I love yarn. I have a collection of yarns in particular that I love the most. They are fuzzy and soft and lovely and later become the key ingredients to my monster recipes. I enjoy touching and seeing my yarn, as all classic knitters/crocheters do. Unfortunately, for the longest time my yarn lived in an ugly box pushed into my Ikea shelf... which meant I'd need to pull it all out in order to comb through my precious collection.
Having solved a similar problem with my fabric collection a while ago, I knew action must be taken... and I had a good idea of what action it was.
A friend of mine is an avid knitter. Back in college she strung up twine in her studio apartment and used cloths pins to hang several lovely skeins of yarn from it. I will never forget how classy and tasteful they looked.... however A) I've accumulated more yarn since college then we both had back then and need a more compact solution and B) I keep most my yarn in tightly coiled balls which clothespins can't actually grip.
 What to do? Well, the solution of course involved pins. All good things involve something sharp, yes?
First off it started with me realizing all my yarn balls kept unwinding as they rolled about. For the balls thick enough, this was solved by coiling the tail around a T pin and sticking it into the ball. I fucking love T pins- so useful!!
That got me thinking... which lead me to my floral/hat pins. I do not love them. They are super long with a pearly head- which is why I got them- but utterly impractical. They bow under too much pressure- and by that I mean any at all- and don't actually mesh well with my pins and T pins for solder bugs. I however had a box of, like, a gazillion of them to find some use for them.
Solution : stick the hat pins through the yarn balls & skeins and hang them from something!
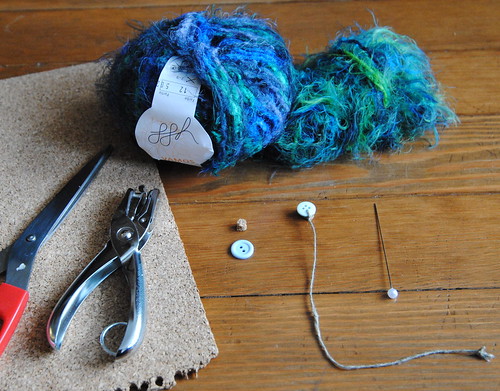
The supplies and tools are simple :
- Tools
- Scissors
- Hot glue gun
- Hole punch (optional)
- Scissors
- Supplies
- Floral / hat pin (1 per)
- Buttons (1 per)
- Cork-board (only a tiny section used)
- Chain(s)
- Hot glue
- Thread / v. thin yarn
- Floral / hat pin (1 per)
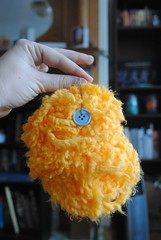
The cork-board came from a hardware store (6 flat squares) and has proven useful for a number of projects and makes an excellent work surface. Using scissors, cut tiny squares (~1 cm x 1 cm) or- as I later discovered- you can use a hole punch to achieve cleaner results. Select a complimentary color button for the yarn you're going to hang.
Cut a length of thread (you'll quickly figure out what's right... ~5 inches to start with) and tie one end through one of the button holes. Hot-glue the cork-board bit to the button, trapping the short thread end in place for neatness purposes.
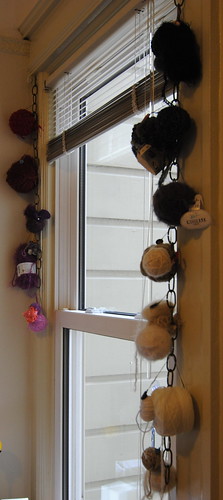
Take the other end and tie it tiny loop through it (small enough that the hat pin's top can't pass through). Stick the hat pin through the loop, spear as many yarn balls/skeins you want and jab that hat pin end into the cork board bit. Bam! You've got yourself a little hanger.

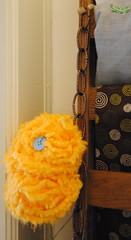
Next you take a chain and hang it somewhere. The chain I got came from a hardware store and was perfect. Note that each link is C shaped with a tiny gap where the ends meet. This gap was just the right size to slide the hanger's thread through, which made hanging and re-hanging the yarn extremely easy. I got 2 types of chain (the color variation is too subtle to see in the photos), used a pair of pliers to separate them into smaller chains, and then hung them about my craft room.

I tried to separate and hang them by color. It definitely highlighted my extreme love for the blue-green spectrum and how I really need to stock up on some more reddish hues. The hanger loops slide in and out of the links so easily that shuffling and hanging the yarn clumps has not proven to be a hassel at all. The hanger construction process is super easy so I don't expect any problems as my collection grows either. Now I can easily trail my fingers across my favorite yarns as I come in and out of my room making my craft room even more awesome.
Not owning the apartment we live in, I don't feel I can drill into the ceiling, as would be my preference.... so the only issue now is where to expand to when I (eventually) run out of the chain space I now have. I still have a ways to go however so... we'll tackle that problem when we get there...
No comments:
Post a Comment