Sunday, March 6, 2016

Small magnetic single throw double pole circuit

Back when I was a wee lass I saw Jurassic Park and knew then I wanted to get into computers so that I could create special effects. When I was a bit older we were visiting San Francisco and I went on an Aliens themed "3D" ride around Fisherman's Wharf (or maybe it was in Seattle?) Anyway, I remember being blown away by the experience of the seats moving and air hissing and decided I wanted to do computer stuff that would effect the real world. Fast forward a couple more years and I was at UW, majoring in Computer Engineering with a focus on embedded systems. Fast forward a few more after that and I'm a web dev tinkering with JavaScript... whoops. Might have miss-stepped somewhere along the way... but my love of computers is sound.

I have an inkling of knowledge on how to do things In The Real World but it's pretty weak. Turns out EE is hard and intimidating. But my interest remains strong. This, combined with my experiences doing several Escape Room games and the delight I had playing in a friend's Harry Potter puzzle LARP has lead me to the obvious conclusion that I should organize my own escape game.

Settling in to craft

Happily we got a lot of rain this weekend here in San Francisco. Not only does it help the drought problem, it allowed me to stay inside most of the weekend coding and crafting. And boy howdy is there a lot of coding and crafting to be done for this project.

A majority of the project is computer systems/pure code which I've been chipping away at, but some elements are hardware related and I've certainly been avoiding working on them. I enjoy it! But... it's hard. Thankfully I made actual progress on one portion but also wound up scrapping a different portion after repeated failure. Lets focus on the positive though!

If there's a chance you'll be playing in the game (you know who you might be, my so few Readers), I'd recommend not reading the rest of this post.

Not even half of what I needed Failed ideas

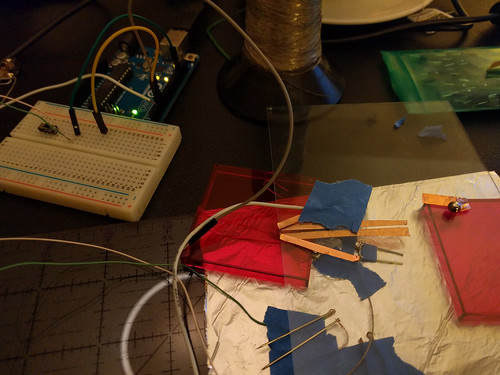
The goal: Have a surface that players can place an object on. The object has several magnets embedded in it, which activate switches below the surface when aligned correctly. The switches are attached to an Arduino which informs the computer, which informs the game server, which then has an effect on the game.

Turns out the end portion of it- the Arduino talking to the server is suuuuuper easy given the pySerial library. So the question here is about the circuit. Magnetic switches in a small space. Not difficult, right?

First attempt: run a wire to a bent paperclip, tape the wire to the hidden "floor" below, and use the wire as a hinge. Have the "surface" above be wrapped in tin foil and ground that. Now the wire runs to an Arduino pin in `INPUT_PULLUP` mode. Boom! Done! Success! When the magnet moves above the paperclip, the paperclip jumps up and grounds itself against the "surface" above and you've got a closed circuit!

Problem: There's only a couple pins on the Arduino and I'd like there be be a number of sensors so that different configurations can be recorded. That means each sensor circuit needs to ground 2 pins so I can have more unique combinations (That's multiplexing... right? Maybe?)

Next attempt: ... somehow close 2 circuits with a single paperclip's movement rather than just 1 circuit.

Problem(s): The paperclips I bent all had a single point of contact where the magnet was. The wire hinge was a bit too ridged/constricting to allow smaller pieces to rise and fall. I tried many different shapes and sizes and padding/fringe along the top of the paperclip that contacted the surface above. The signal was finicky, rarely closing both circuits.

Not really "success," but acceptable

eventually... "success!" (the signal is still a bit finicky, but good enough to go forward for now)

The solution? Have lots and lots of craft items laying around your house... No, really. The solution? conductive thread & copper tape

Conductive Thread : something needs to hold the paperclip to the "floor", allow it to pivot, and make sure it's connected to the circuit. Wire hinges were proving to be too ridged along with folded tape or aluminum foil. Enter the ever magical conductive thread. Taking two strands and tying them to the paper clip solved this problem. The clip was bent to be flat along the bottom, one strand tied to each corner, then the strands taped down with masking tape. It was a smooth hinge and a reliable connection. I wrapped the floor with aluminum foil and grounded it so that each paper clip is grounded via it's conductive thread tie downs.

Copper Tape : originally acquired for stained glass purposes, it's great. One side sticky, one side copper & conductive. Note that the sticky side is not conductive (sadly). I used this to mark out the traces on the bottom of the surface, where the paperclip would connect to. The tape is already pretty thin but I was able to cut it in half and place very close to each other- like laying out a sticker circuit board. I cut the paperclip to be U shaped, anchoring it to the floor at the bottom of the U. Now when the clip jumps up towards the magnet and closes the circuit, it has 2 little points contacting the 2 different traces (rather than one broad one).

Wednesday, January 27, 2016

Gaming Craft

I like gaming. The social aspect is fun, yes, and story telling, but it's this whole crafting/art project portion that really hooks me.

As I've aged I'm finding it a little harder to just make things willy nilly without thought as to why or for what purpose. I've tucked about as many little monsters about the house as Adam will let me. I've given ones to many friends and all family members. Why make more things? Well, making things is FUN! But... why? That's where gaming comes in. Now I'm making not just "something" but rather a prop or an accessory. A visual aid for something that involves more people than just me. Purpose.

D & D : Prep is fun

Up until this point I've mostly been playing in games but 2016 is the year I dip my toe in trying to run them. Picked up the D&D 5e suite of books/rules and have run 2 little one-shot games for my friends. Wouldn't say they've been that successful but I've definitely enjoyed having friends over and having an excuse to think creatively. The first game involved a 2 level map where I drew the ground on graph paper and then had a tree branch level drawn with dry erase markers on a glass shelf (resting on several cardboard tube tree trunks). The second involved a dungeon map slowly revealed as people explored it.

D & D : ready for that dungeon crawl

Turns out peeling off square by painful square of "fog of war" isn't super fun. Also, candy colored "fog of war" really doesn't add to the "dungeon crawl" vibe... The problem wasn't the taping down (that actually worked super well) but just the general scrabbling for a hold on tiny paper piece in order to pick up. One takeaway from it though was that drawing the map was a good exercise in thinking about the story and helping me build out an idea. Drawing is my best way of building a narrative- something I've known for a while.

Rogue Trader : Homework

Another delightful gaming craft recently worked on was the Rogue Trader Yu'Vath Battlestation Assault Plan. Given a rather math-y description of a patrolling ships around a point of interest, friend Nate and I wrote a little simulator to help find the best approach. Mind you, this is for a game I'm not even in. Was thrilled to have a valid reason to use the three.js library again and limber up my mind, wrapping it around 3D math/space/modeling. Not sure how long Nate will host it for, but the simulation is up at this site right now. [code posted on Github]

Monsterhearts : The PCs
While not really a craft, I've found games (mine but especially others') to be an excellent source of sketching and art. Friend Kelly drew the characters from a game and then flattered me by asking to help with inking/coloring it. I appreciate that with her effort/interest/involvement I managed to overcome the wall of white space most my sketches hang in and provide the vaguest of something for background (drawing backgrounds being my majorly failed 2015 New Years resolution). Never mind the fact that it's mostly a munged photo I found on the Internet...

I was going to follow this up with several more gaming sketches but alas this week's plot didn't get far enough...

Named arrows fly better

Along the gaming craft tangent: applying game content to other activities. Friend Suko and I continue our once-a-month shooting. I've marked my arrows with names of 4th Terminus characters and not only does it help me improve my aim/track my shot history but it also tells a story with every round. "Oh Hayley, once again going off target. Morgan, always flies true. Jayce, right where I send him and look at that- the Jaya arrow is snug up against him. Again." What I need to do now is figure out a better way to label the arrows. Right now I've scribbled the names on the nocks (over half of which need to be re-aligned) but the ink rubs off so easily there.... Anyway, the important take away is that once I named my arrows and could track which offset/corrections were needed for each I was able to hit the bullseye three times with the arrow named Jaya. Just saying. The other arrows need to start pulling their weight.

In conclusion gaming is fun. Friends are great, telling stories with them is a fantastic way to pass the time, and using said content to overlay on other actives makes everything better.


Sunday, January 3, 2016

Drawing 2016

Started the new year off right with an intense bout of sketching. On Friday I spent ~8 hours in front of the Cintiq and Saturday I followed up with a couple more.

Pride & Prejudice & Zombies

Drawing that much in one continuos flow felt great. The pictures themselves I don't know, but the feeling was fantastic. If I could draw like that more often I'm pretty sure I'd actually get better. Last night I had a vivid dream that I was still sketching, woke up partially and continued to feel it. "Gotta' make sure I save..." I remember thinking. This amuses me because it's the same sort of sleep processing feeling I get when I'm coming up to speed on a new programming language.

The main resolution last year that I completely bombed was "learn to draw landscapes" and it's definitely one I still want to try to tackle this year. And by landscapes I mostly just mean backgrounds, even the faintest of hints, for my sketches....

Corvo- so weak!

Using Clip Studio Paint as my primary sketching app & then doing colors/fill in Photoshop is working out quite well. I'm in love with the smoothing CSP does to the lines and I love the sensitivity options on the Pen & Pencil tools. I'm often jumping to the Marquee tool to reposition/resize my sketching as I go and often toggle back to the Pen tool by accident for a couple of strokes when I actually wanted the Pencil tool (both toggle on the P key). This has given an interesting sort of pacing/cadence to the the line sketching. Light feathery lines (Pencil), correction (Marquee), a few bold strokes (Pen), repeat.

Still feeling quite restrained in what I'm drawing though. Only used a pinch of photo references for the non-human elements but all subjects/scenes were from gaming sessions. Descriptions I heard or read. None of the crazy emo feeling sketches that spill out from my pen when I reach down inside and try to personify what the fuck is going on in there. Maybe next time.

...

Sunday, November 29, 2015

A Quite Thanksgiving

Indecision Pie

Thanksgiving this year was a medium sized gathering in the South Bay with friends. No family, mine being scattered about this year and all the girls lacking the freedom/time to travel. Alas. Looks like Christmas will also be Steckerless for the most part.

My contribution to this year's meal was potatoes and pie. My much anticipated (by me) purple potatoes and coconut cream (aka vegan mashed potatoes) was an absolute dud this year. I blame the potatoes. The pie however went well. Earlier this year I had a pie crust near-fiasco... which is ridiculous now that I look back at it because I have/had a food processor. Used it for the first time to make pie crust and am never going back.

Indecision Pie Progress

Adam made Pumpkin Pie to ensure a reasonable dessert was available. I couldn't top the Venn Diagram Pie of years previous but thought hard to come up with something fun. Wound up with Indecision Pie. I used scrap aluminum (from a project waaaay back when) to create structural supports for some concentric circles. Blind baked the crust with only the inner circle for the first 12 min since that has the foil & pie weights portion. Removed foil & weights and added super-thin outer circle and cooked another 15 min. When it came out of the over I removed the inner support right away (no problem) but the outer support I left in place until I filled the apple section because it was likely to topple if left alone. Middle portion was left-over pumpkin pie and some raspberry filling ended up in the center.

In hind-sight go apple, raspberry, pumpkin next time. Apple & pumpkin: that's a no.

Thanksgiving Tarot

After dinner there was some tarot reading for some folks and one of the dogs. Amusing and silly. Sadly no one in attendance actually knows much about the cards so every step of the way required flipping back and forth through a book. There was also an I Ching reading/toss(?). There was also a walk. A fine tradition, that. I love the post-Thanksgiving meal walk, wherever it may be or go.

Traditional Pumpkin & Tea

Many things to be thankful for this year. A year of changes for myself and many around me, most (all?) of them for the better. Lots and lots of new jobs, I gained a brother-in-law, there was another Dr. Stecker in the family (for about 2 weeks before she went and got married and took his name- ARRRrrrggg!) and if things All Go Well there will soon be another one (who will keep her title/name pairing). I am thankful that these job changes have been for the better. That I've been gaining family and not losing it. Relationships starting and deepening rather than fraying or ending. I retain my health and others appear to be doing well (except perhaps for the dear Grandmothers). In fact my health along several different axes is in a much better state now than it was this time a year ago. The world at large seems to be becoming more hostile and dark (though perhaps that's just my age tinting my world view) but I am thankful that my life appears to be trending the opposite direction. I'm meeting more people who I find enjoyable. I'm continuing to add to the "things I can do" pallet of possibilities.

Life is good.

Monday, November 2, 2015

Getting 8 pages from a US Letter page

This is one of those things where I'm sure the answer is clearly posted somewhere on the Internet... and I just really couldn't find it. So I'm typing up my solution here in the hopes that the next person who looks for the answer can more easily find it.

The problem was simple- I have a single piece of "normal" US Letter paper. I wanted to get 8 pages (4 per side) out of it. I also wanted the page to be part of a signature, which meant the layout of the pages wasn't just 1-4 on one side and 5-8 on the other. What am I printing? I'm printing a PDF of N pages. It happened to be generated by LaTeX but that shouldn't matter for this really.

So, how? Easy- use two command line tools pdf180 and pdfjam. The pdf180 command is required to flip the pages upside down so that they're right-side up when you do the first fold (which will later be cut open). pdfjam is required to correctly tile 4 pages per side of the paper so they're in the right order when you do the second (spine) fold.

That means a simple, single page would look something like this:
# assuming what you want to print is named MY_STORY.pdf
pdf180 MY_STORY.pdf --outfile TEMP_FLIPPED.pdf

pdfjam --nup 2x2 TEMP_FLIPPED.pdf '1,8' MY_STORY.pdf '4,5' TEMP_FLIPPED.pdf '7,2' MY_STORY '6,3' --outfile LAID_OUT_STORY.pdf

You now have a nicely laid out LAID_OUT_STORY.pdf to print and a TEMP_FLIPPED.pdf file you can delete.

That's all cool... but what if you're trying to print, say, a 445 page document? And you want to use 4 pieces of paper per signature for a total of 32 pages, front and back? That requires... PROGRAMMING! So I wrote a script which you can find over at my GitHub repo: signature_creator_32.sh. There's also the 2 pieces of paper/16 pages total, front and back variant: signature_creator_16.sh. If I were a not-lazy programmer I'd have written a single script that could dynamically take how many pages per signature. Oh well.

Disclaimer: the scripts don't handle missing pages at the end of your document. It does notify you if it's expecting blank pages, but what that really means is that it'll crash on the last pdfjam call. Just copy the command printed to the terminal and add in {}s instead of pages numbers that exceed your page limit. Again, if I were a not-lazy programmer I'd have written that in too, but bash scripting was... icky.

What this gets you is a new folder called output (careful! all content in existing output folder will get deleted!) filled with files temp_sig_1.pdf, temp_sig_16.pdf, temp_sig_32.pdf... etc, the number being the first page for that signature set.

So now you have as many files as you have signatures. That's obnoxious if you want to take a thumb drive to Office Max or something and have you print 3 copies of the book. So there's a second script called glue.sh that you can run and it'll reach into the output directory and squish all the temp signature files into one file called book.pdf. And that is what you print.

Warning: if you go to the last page of the book.pdf, don't freak out that it doesn't have the last page of your original document! Remember, the signature is folded so the last printed pages will actually be some 6-12 away from the actual "end" of your book. I forgot this fact once and spent nearly 5 minutes having a heart attack thinking I had printed four copies of the wrong file.

Great! Now you have a stack of paper with your content printed on it! In the case of my 445 book that means 56 pages that need to be folded into 14 signatures.... and heaven forbid you get those pages out of order. Even with them being in order it takes a little bit of a mental warm up to ensure you fold them correctly. And so, here's an animated image and some basic steps to take in order to fold correctly:

  1. Ensure the lowest page number for the signature is in the upper left corner (upside down)
  2. Take page off of stack and place it "face" down, landscape. Lowest page number now lower right, face down in front of you.
  3. Hamburger fold the page, left side atop right. You can verify correctness by ensuring page numbers are consecutive inside the fold. Lowest page number still face down. Press edge with bone folder.
  4. Set aside. Repeat steps 1-3. You can be certain things are aligned correctly when the page number offsets of lower top page are 4 apart. They increase 4, 8, 12, 16, 20, 24, etc. Looking at the ones digit it's easy to follow the cycle -> 4,8,2,6,0,4
  5. On your 4th page stop. You'll know you're done with this signature set because after the hamburger fold in step 3 the to page should have consecutive pages. This is the middle of the signature.
  6. Use a knife to slice half the fold on each piece of paper- be consistent on which half you cut. Don't cut the rest of the fold until you're done with stitching the spine. If you're going to use a guillotine, just let it deal with the fold. Brace against something flat, fold, and press! VoilĂ ! Now you have a signature!


Final note: since I used LaTex, here is what my page geometry looked like for the original PDF generated:
\geometry{
     a5paper,
     % due to the folded nature of my printouts, and the
     % failure to scale the paper correctly the bottom
     % and non-bound margins have extra space. The top
     % and the bound margin are expected to be the
     % specified offsets here.
     bottom=4mm,
     left=2mm,
     right=2mm,
     top=20mm,
     bindingoffset=15mm,
}

That's what I printed. And things looked great! And then I stitched my 14 signatures together and some skew crept in. And then I used the guillotine and came within a hair's width of losing content on the top and bottom. I didn't! But it was waaaay to close for comfort. Will definitely be adding 5mm to the top and bottom margins next time around.

Final final note: I used \documentclass[10pt]{book}, \setlength{\parindent}{5mm}, and \setlength{\parskip}{4mm}. It's tiny, but legible. Definitely don't go smaller! A little larger would probably be nice but I couldn't afford to bump the book length any longer than it already was.

Sunday, November 1, 2015

Completed: Book binding

My five editions of the first two volumes of 4th Terminus are done. An epic (for me) feat started just after I quit work (July 15th) and completed almost three months later (October 7th).

All of them done & paired

Many many thanks to both friend Suko for her copy editing time & efforts and friend Scott for the inspiration & assistance on the binding project overall. Scott has been into book binding for many years and was good on his promise of helping me out when I finally found something I wanted to print & bind. Of course, I think original promise was to assist with "a book" rather than a printing run of ten at once. Luckily Scott is the right kind of nerd in all things and seemed to enjoy as much as I the challenges & differences unique to mass production.

No irrecoverable mistakes were made! Really, the only goof was that I should have affixed my end papers BEFORE I pasted on the crash. Instead, I wound up hand trimming them and adding them in just before the covers went on. Smoother gluing of end papers to cover and better shoulder position/size would have helped things, but I assume I'll just get better at that with practice.

Cut once, measure DEAR GOD ONE MORE TIME! Dramatic differences + smudge
All lined up

The guillotine cutter was magical and made my lame hand-bound signatures transform into some professional looking content. It also left behind little black smudges on my beautiful white paper. Luckily Scott and I had already been discussing the idea of speckling the page edges- the smudges just made it a requirement. Purple & black were selected for reasons and did an excellent job of hiding the blemishes.

Looks like official paperbacks Obfuscating those smudges

Scott bravely operated the foil heat machine, facing down a number of hiccups/problems. Turns out the foil and the book cloth don't mesh well. Maybe next time leather is needed? Regardless, all of the printings look great and really gave the books an old library book vibe. Which is good.

Foil machine The best pair

Turns out mass-producing books takes TIME (especially when we're semi-figuring things out as we go) so after the cloth was printed & covers were cut, Scott and I parted ways as our time was up at the the Center for the Book. Great place, that. Will be going back again for classes. Knowing what I know now, will be much faster/better prepared when renting equipment/space/time in the future. Anyway, it meant the cover construction and assembly happened at home, unsupervised. I think it went pretty well.

Getting close Covered cover The queue...

I wound up gluing most the covers on at the session in which I handed the books out. Time management. It's hard.

Knowing what I know now, I'd say the steps for the next run of books I do will be as follows:

One of my main regrets was that I didn't take better photos throughout the process. My phone camera is pretty weak-sauce. Luckily friend Suko took some excellent photos of her books! (and if you follow either of us on other social medias, you're probably sick of seeing them over and over by now) Re-posting them here, with her permission, for prosperity:

Suko's copy An interior shot Suko got the best endpapers

Sunday, October 18, 2015

Completed: 4th Terminus quilt

The quilt is done and has been out of the house for over a week. Success.

This is the first quilt I have "finished" the quilting for and put through the wash. Yikes, what a heart attack! I was not prepared for the state it came out of the wash in and almost burst into tears. Turns out A) quilt batting holds a fuck ton of water and B) light colored fabric is SUPER transparent when wet. Thankfully one of SF's little mini October heat waves helped shed the water and the fabric returned to it's opaque state upon drying. Those first couple moments though... All the track stitching was done in red and while I clipped the threads, I didn't trim them back as short as I should have. Which meant that veins of red creeped out from the tracks when it was wet and all the character portraits had spider webs of black thread behind them.

Quilting

I'm shocked to say the quilting process was rather fun. And this is the first time I've abandoned the use of a frame and just quilted in my lap. Would not do so for the primary stitching lines that holds everything in place (yay for having a quilt frame for that!!) but for the "filler" stitching, it worked well. While I continue to swear that "the next time" I'm shipping the damn thing off to be machine quilted by professionals, I do find it to be quite appealing to add custom stitches specific to the quilt design. Used masking tape to help guide the lines, and that proved to be very useful. Have also used masking tape to guide applique sewing (because I suck at pinning), so that stuff is turning out to be a vital to have on hand.

The bare minimum Quilting

The back of the quilt was more complicated than it needed to be/should have been. For some reason I thought "Wow, this is waaaay too nerdy looking! It needs a stealth mode where you can flip it over and it doesn't look so... silly." So I did some minor slap-dash squares in a variety of fabrics. The rushed sewing job (and non-cotton fabric types) meant that it didn't lay perfectly flat, which became most noticeable when the quilting chased down all those wrinkles and pinned them in place. Oh well. This will be yet another flaw lost in the sea of detailed-stuff-going-on. On the up side, the station stitching clearly shows through the back of the quilt which I find to be quite fetching. Makes the effort of hand stitching such details more worth it.

Quilt Back

And now, don't make fun of me, I'll confess I've started a sample square as a proof-of-concept for next quilt*... Poor Adam was a bit sad to see the 4T one leave- it's one of the few I've made that was large enough to cover him. So we talked a bit and kicked around a very Adam-specific idea that I'm pretty excited about. And again it's overly complex, very specific, will take forever, and will probably require hand quilting... I'm so excited!!

* I have not forgotten that I've plans for another 4T quilt for another individual! But that one actually requires the game to end before I can start on it so this one is... like... an exceptionally complicated palate cleanser...

Quilt Top

You can check out more photos over at the Flickr album.